How to Look Younger in Passport Photos: 9 Tips That Work Within the Rules
This photo will represent you for 10 years. The drug store gives you 30 seconds. Here's how to take control of the result.
I renewed my passport last year.
The woman at the pharmacy had me stand against a white wall, said "look here," and pressed the shutter before I could even straighten my shoulders. The whole thing took about 15 seconds.
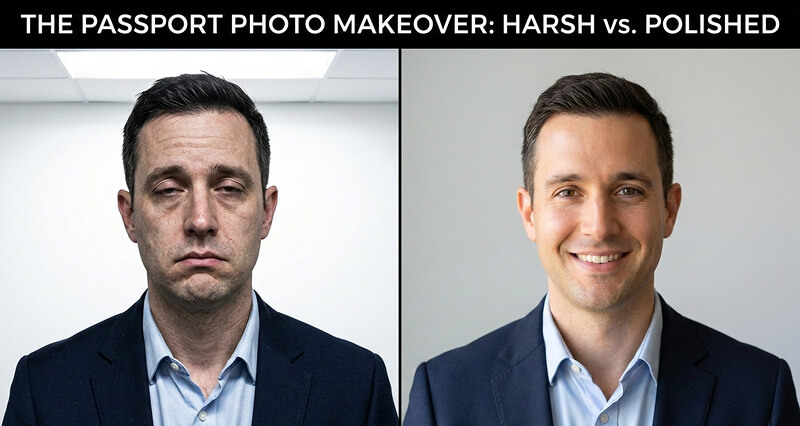
When she turned the screen around to show me the result, my first thought was: Who is that tired, washed-out, vaguely startled person?
My second thought was: That's going to be my face on every international border crossing for the next decade.
Passport photos have a special talent for making people look worse than they actually look. The lighting is brutal. The expression is forced. The environment is stressful. And unlike every other photo in your life, you can't retake it twelve times, pick the best one, and add a filter.
But here's what most people don't realize: you have far more control over your passport photo than you think. Not by cheating the system. Not by using filters (the U.S. State Department explicitly prohibits digital alteration, AI, and filters for passport photos). But by preparing properly.
The difference between a passport photo that ages you ten years and one that actually looks like you is almost entirely preparation. And preparation takes about 20 minutes, not 20 dollars.
Here are nine tips that work within every government regulation.
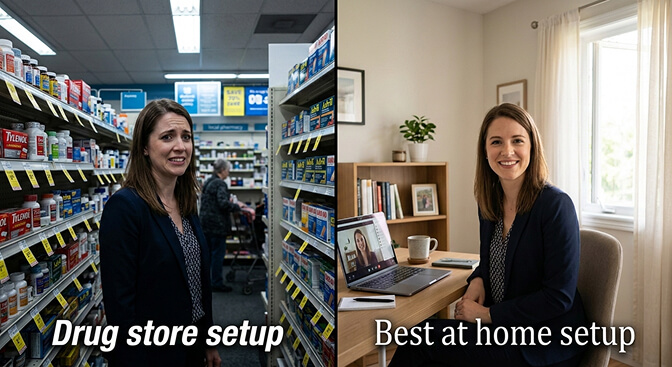
Tip #1: Don't Take It at the Drug Store
This is where most people get it wrong.
The person behind the pharmacy counter taking your passport photo is not a photographer. They're a cashier who was handed a camera. The lighting is fluorescent (the most aging light source in existence). The background is a pull-down white sheet that may or may not be wrinkled. And you get approximately zero coaching on expression or posture.
Take your passport photo at home instead. Every major passport agency, including the U.S. State Department, accepts photos you take yourself as long as they meet the technical requirements (2x2 inches, white background, proper head sizing, eyes open, mouth closed, no glasses).
At home, you control the lighting, the timing, the number of attempts, and the environment. That alone eliminates most of what makes passport photos terrible.
Alternatively, some professional photographers offer passport photo sessions. These cost more ($20-50 typically) but the lighting quality and posing guidance make a noticeable difference.
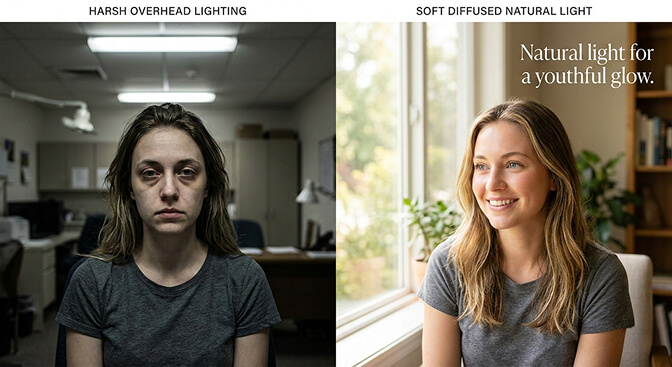
Tip #2: Face a Window (Lighting Is Everything)
If you remember one thing from this article, let it be this.
Fluorescent overhead lighting adds years to your face. It creates dark shadows under your eyes, emphasizes every line and wrinkle, and washes out your skin tone. This is the default lighting at every pharmacy, post office, and government office where passport photos are taken.
Natural window light is the opposite. It's soft, diffused, and fills in shadows rather than creating them. Photographers pay thousands of dollars for equipment that mimics what a large window does for free.
The setup: Face a large window on an overcast day (or any window where direct sunlight isn't streaming in). The window should be in front of you, not behind you or to the side. Position yourself about 3-4 feet from a plain white wall behind you.
This one change will make more difference than everything else in this article combined. The light fills in under-eye shadows, smooths the appearance of fine lines, and gives your skin a natural, healthy glow instead of the sickly green cast of fluorescents.
The single biggest factor that makes people look older in passport photos isn't their age. It's the lighting. Fix the lighting, and you've fixed 70% of the problem.
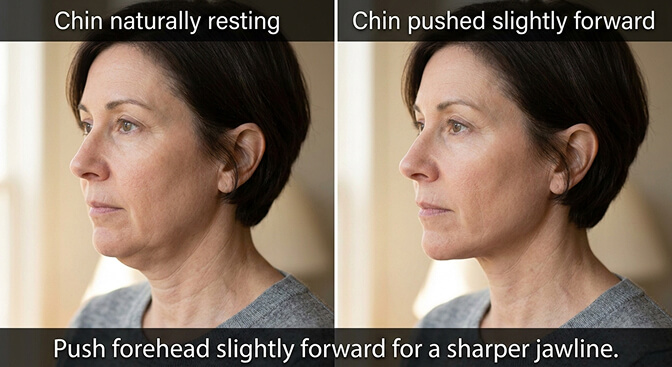
Tip #3: The Subtle Chin Push (Peter Hurley's "Turtle")
Passport regulations require you to face the camera directly. You can't tilt or angle your head. But you CAN make one small adjustment that sharpens your jawline and reduces the appearance of sagging under the chin.
Push your forehead very slightly toward the camera while keeping your chin level. Photographers call this "the turtle" because it resembles a turtle gently extending from its shell.
This subtle movement stretches the skin along your jawline, creating a more defined, youthful jaw without any head tilt that would violate passport rules. The adjustment is maybe an inch. It feels weird from the side but looks completely natural from the front.
The key: Push forward, not up. Pushing your chin upward exposes the underside of your nostrils and looks unnatural. Pushing your forehead forward keeps your face parallel to the camera while tightening the jaw.
For more on this technique and other posing fundamentals, our guide to the best headshot angles for double chin covers the full breakdown.
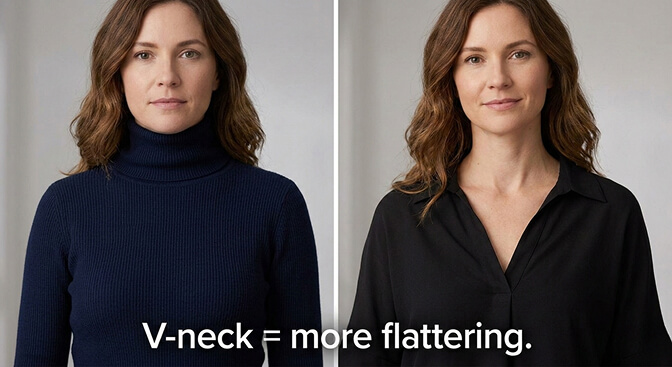
Tip #4: Wear the Right Neckline and Color
Only your shoulders and collar are visible in a passport photo, but what you wear matters more than you'd think.
Color: Wear a color that contrasts with the white background. Black, navy, dark green, or burgundy create a clean separation between you and the background. Avoid white, cream, or very light colors, which blend into the background and make your face look like it's floating in space. For more color guidance here is a complete guide on best colors to wear for a headshot.
Neckline: A V-neck or open collar elongates the neck and creates a more youthful frame around your face. Round necklines and turtlenecks shorten the neck visually and can emphasize fullness under the chin. A collared shirt works well for both men and women.
Fabric: Solid colors only. Patterns, stripes, and logos distract the eye and create visual noise in such a tight frame. Solid dark fabric keeps all the attention on your face.
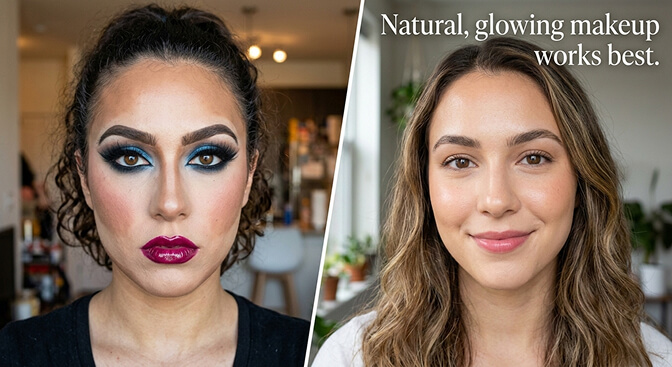
Tip #5: Strategic Makeup (Enhancement, Not Disguise)
Passport regulations allow makeup. The rule is that you should look like yourself. Light, natural-looking makeup is perfectly acceptable and makes a significant difference under any lighting.
For everyone: Use a mattifying powder or setting powder on your forehead, nose, and chin. Shiny skin reflects light unevenly and emphasizes texture. Matte skin photographs smoother and more evenly lit. This is the single most effective makeup tip for any official photo.
To look younger specifically:
- A light concealer under the eyes counteracts the dark circles that harsh lighting creates
- A touch of blush on the cheeks adds warmth that flat lighting strips away
- Defined eyebrows frame the face and create structure (lightly fill in any sparse areas)
- Neutral lip color adds definition without drawing attention
What to avoid: Heavy contouring, dramatic eye makeup, false lashes, or anything that makes you look significantly different from your daily appearance. The photo needs to be identifiable as you. Follow this eye makeup strategy for professional headshots to get better results.
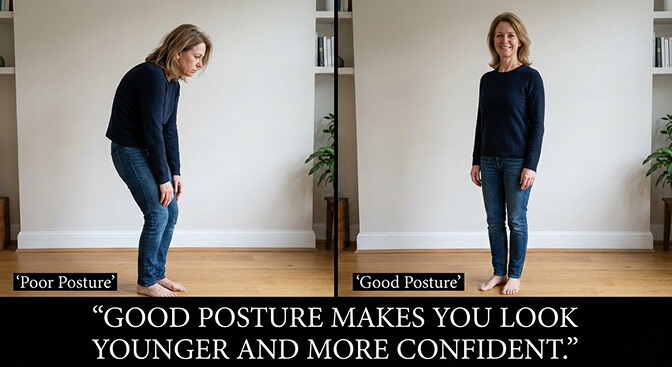
Tip #6: Posture Changes Everything (Even in a Headshot)
You'd think posture wouldn't matter in a photo cropped to your head and shoulders. You'd be wrong.
Sit or stand tall. Roll your shoulders back and down. Imagine a string pulling the top of your head toward the ceiling. This straightens your spine, elongates your neck, pushes your chest forward slightly, and pulls everything into a more confident, youthful position.
Slouching compresses the neck, pushes the chin forward and down, and creates the droopy, tired appearance that makes people look older in photos. Good posture does the opposite. Even though the crop is tight, your neck position depends entirely on your spine, and the camera sees the difference.
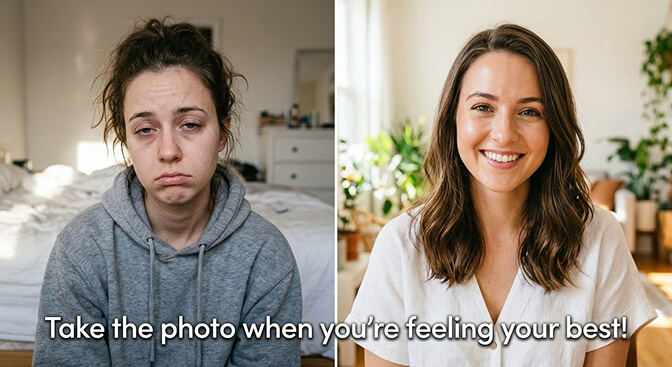
Tip #7: Time It Right
This sounds simple because it is. And almost nobody does it.
Don't take your passport photo when you're tired. Your face looks measurably different when you're rested versus exhausted. Under-eye puffiness, skin dullness, drooping facial muscles. These aren't permanent signs of aging. They're signs of fatigue. But the camera captures them permanently.
Take your passport photo mid-morning on a day you've slept well. After you've been awake for 1-2 hours (long enough for morning puffiness to subside) but before afternoon fatigue sets in.
Exercise lightly before the photo if you can. A 20-minute walk increases blood flow to the face, adds natural color, and makes your skin look healthier and more vibrant.
Stay hydrated. Drink water throughout the morning. Dehydrated skin looks thinner, duller, and shows more lines. Hydrated skin looks plumper and smoother.
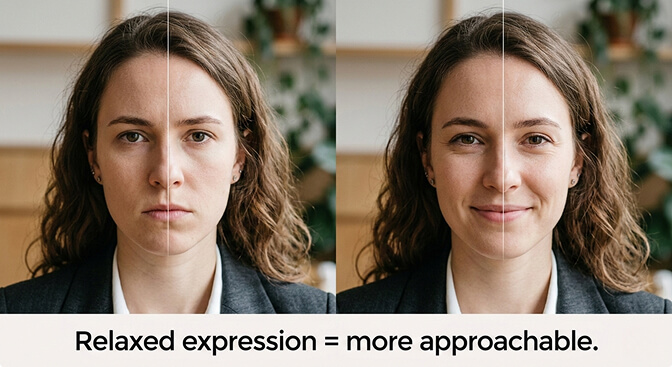
Tip #8: The Mona Lisa Expression
Passport rules require a "neutral expression." Most people interpret this as "look miserable." This is a mistake.
"Neutral" means eyes open and mouth closed. It does NOT mean expressionless. You can absolutely have warmth in your eyes and the slightest upward turn at the corners of your mouth. Think of the Mona Lisa. Technically neutral. Not smiling. But clearly not unhappy.
The trick: Think of something genuinely pleasant right before the photo. Not hilarious (you'll smile too much) but warmly pleasant. The thought relaxes your facial muscles, softens your eyes, and creates the subtle expression difference between "vibrant human" and "booking photo."
Tense facial muscles add years. Relaxed facial muscles subtract them. The Mona Lisa expression is the single best technique for looking more youthful within the neutral expression rule.
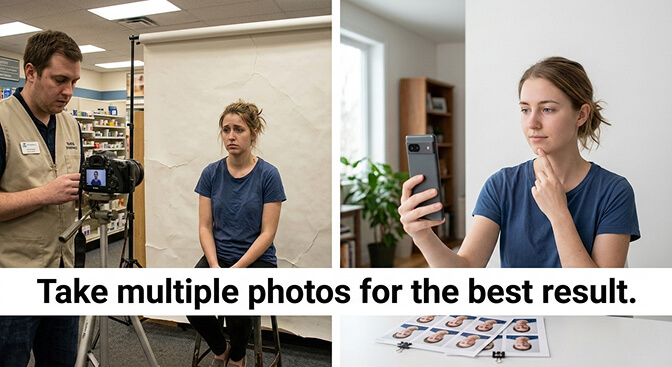
Tip #9: Take It Yourself (And Take a Lot)
This brings everything together.
If you take your passport photo at a pharmacy or post office, you get one shot. Maybe two if you ask nicely. The lighting is fixed. The timing is whatever slot you booked. You're stressed, rushed, and have zero control over the process.
If you take it at home, you get unlimited attempts. You control the light (window). You control the timing (mid-morning, well-rested). You control the preparation (makeup, clothing, posture, hydration). And you can take 50 photos and choose the best one.
The technical requirements are straightforward: White or off-white background. 2x2 inches for U.S. passports. Head between 1 and 1-3/8 inches from chin to top of head. Eyes open. Mouth closed. No glasses. No filters, no digital alteration, no AI modification.
Take the photos, print the best one at a pharmacy or drugstore photo printer (usually under $1), and submit it with your application. You'll have a passport photo you chose from dozens of options instead of one a stranger took in 15 seconds.
The Part That Goes Beyond Passports
Here's the thing about passport photos. The rules are strict for a reason. The government needs a photo that accurately identifies you. No filters, no AI, no retouching.
But most of the photos in your professional life DON'T have those restrictions.
Your LinkedIn headshot. Your company website photo. Your conference speaker bio. Your email signature. These photos can absolutely use professional lighting, optimal angles, expert retouching, and yes, AI-generated enhancements that present you at your best.
If you're concerned about looking younger in photos, the passport photo is actually the one photo where your options are most limited. For everything else in your professional life, you have far more tools available.
At Headshot Photo, you can upload a few casual selfies and get studio-quality professional headshots with optimal lighting, angles, and polish in about 1 hour. No appointment, no aging fluorescent lights, no rushed 15-second process. For the photos that represent you professionally, you deserve better than the pharmacy experience.
For a deeper guide on what to wear and how to present yourself in professional photos where you have full creative freedom, check our guide to the best outfits to wear for headshots.
One Last Thing
My renewed passport photo? I retook it at home, facing my living room window on a Saturday morning after a good night's sleep. I wore a dark navy shirt. I did the turtle technique. I took about 40 photos and picked the one where my expression had the most warmth without technically smiling.
It's not a glamour shot. It's a passport photo. But when I look at it, I see myself. Not the tired, washed-out version the pharmacy created. Just me, on a decent day, with decent light, looking like someone who has their life at least somewhat together.
That's all a passport photo needs to be. And that's all it takes: 20 minutes of preparation for a photo that follows you for a decade.
The 20 minutes are worth it. Trust me.
Frequently Asked Questions
What is the best way to look younger in passport photos?
The most effective technique is controlling your lighting. Face a large window with soft, indirect natural light instead of using harsh overhead fluorescents. Natural window light fills in under-eye shadows and smooths the appearance of fine lines, making you look significantly younger without any digital alteration. Combine this with good posture, strategic clothing choices, and taking the photo when you're well-rested.
How does taking a passport photo at home compare to a pharmacy?
Taking your passport photo at home gives you control over lighting (natural window light vs. fluorescents), timing (when you're rested vs. whenever your appointment is), and number of attempts (50+ vs. one or two). The result is consistently better-looking photos that still meet all government requirements. Print your chosen photo at any drug store for under $1.
How do I look good in a passport photo without breaking the rules?
Focus on what you CAN control: natural lighting from a window, good posture, the turtle chin technique for jawline definition, dark solid-colored clothing with a V-neck or open collar, light mattifying makeup, and timing (mid-morning after good sleep). The U.S. State Department prohibits filters, AI, and digital alteration, but these preparation techniques are completely allowed and make a significant difference.
Is it worth paying for a professional passport photo?
Professional passport photo sessions ($20-50) are worth it if you're not comfortable with DIY photography. Professional photographers provide better lighting and posing guidance than pharmacies. However, for standard professional headshots needed for LinkedIn and business use, AI headshot generators like HeadshotPhoto deliver studio-quality results at similar prices with no restrictions on enhancement.
Can I use AI or filters on my passport photo to look younger?
No. The U.S. State Department and most international passport agencies explicitly prohibit digital alteration, phone filters, and AI-generated images for passport photos. Using them can result in your application being rejected. However, for professional headshots used on LinkedIn, company websites, and other business contexts, there are no such restrictions, and AI headshot generators can create polished, youthful-looking professional portraits from casual selfies.
