Best Slimming Poses for Headshots: 7 Tricks That Actually Work (No Photoshop Required)
Let’s get something out of the way first.
You don’t need to lose weight to look great in a headshot. You need to understand how cameras see your body differently than mirrors do.
My colleague David is a financial advisor. Fit guy. Works out four times a week. But when his company hired a photographer for new team headshots, the results made him look like he’d gained twenty pounds overnight.
His wife saw the photos and said, “That doesn’t even look like you.”
David didn’t have a weight problem. He had a posing problem.
The photographer stood him square to the camera, arms pressed against his sides, chin slightly pulled back. It’s the worst possible combination for anyone who wants to look their best in a photo. And it happens constantly because most photographers rush through corporate sessions without taking the time to coach each person.
Here’s the good news. The difference between a headshot that adds weight and one that makes you look lean and confident comes down to a handful of tiny adjustments. Most of them take less than two seconds.
We’ve seen this play out across thousands of headshots at Headshot Photo. The people who look best in their photos aren’t necessarily the thinnest. They’re the ones who understood a few basic principles about how cameras flatten three-dimensional bodies into two-dimensional images.
Let’s break those principles down.
Why Cameras Add Weight (It’s Not a Myth)
You’ve probably heard the old saying that the camera adds ten pounds. It’s not just folklore. There’s real physics behind it.
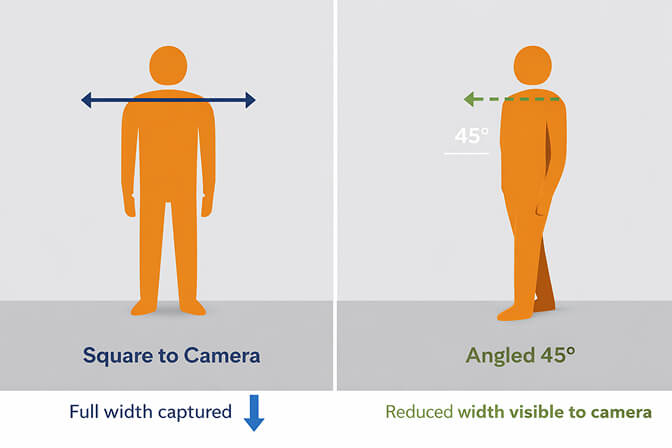
A camera lens compresses depth. Your body exists in three dimensions, but a photo only captures two. When you stand flat and square to the camera, all of your width gets captured but none of your depth. The result is that you look wider than you actually are.
This is why you can look fantastic in a full-length mirror, completely comfortable with your body, and then see a photo of yourself and think “Who is that?”
The gap between how you see yourself in the mirror and how a camera captures you is one of the most frustrating things about professional photography. In the mirror, you see yourself in motion. You unconsciously adjust your angle. You catch the light just right. A camera freezes one fraction of a second, and that frozen moment rarely matches your internal self-image.
But here’s the flip side of that physics lesson. If cameras compress depth, then creating depth through posing gives the camera less width to capture. That’s the entire foundation of slimming poses.
Every technique below works on this single principle.
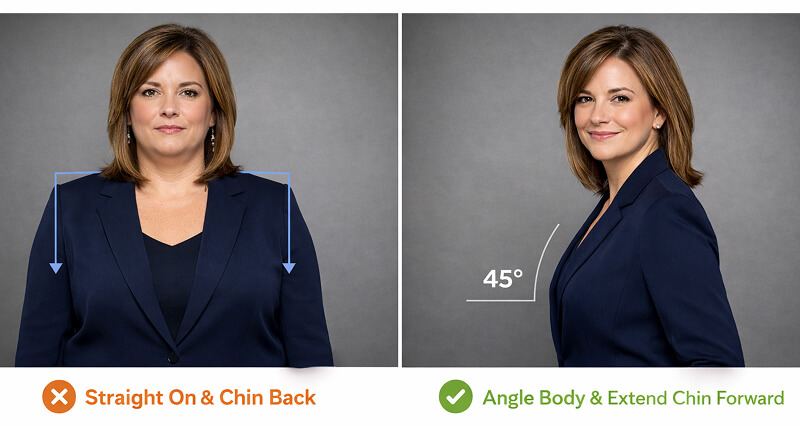
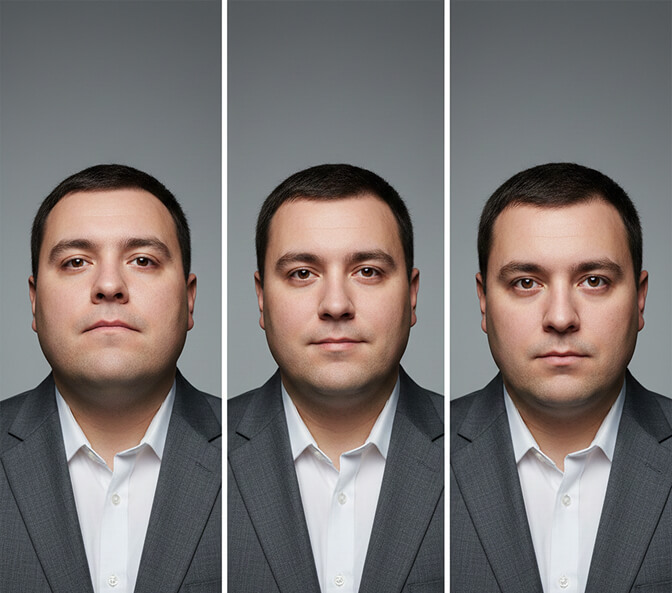
Pose #1: The 45-Degree Body Angle
This is the single most effective slimming technique in portrait photography. If you learn nothing else from this article, learn this.
Instead of facing the camera straight on with both shoulders squared toward the lens, turn your entire body about 45 degrees to one side. Then rotate just your head back to face the camera.
What happens? Your shoulders now present at an angle instead of at their full width. Your torso narrows. And the slight twist through your midsection creates a natural, dynamic line that the eye reads as leaner.
This works for literally everyone. Men, women, every body type.
The mistake most people make is turning too far. You’re not going for a full profile shot. You want roughly a quarter turn. Think of it as pointing your belt buckle toward the corner of the room rather than directly at the camera.
Quick test you can do right now: Stand in front of a mirror, face it directly, and note how wide your shoulders look. Now turn 45 degrees and look over your shoulder at the mirror. See the difference? That’s exactly what the camera sees.
Pose #2: The Chin Push (AKA “The Turtle”)
This one sounds ridiculous. It feels even more ridiculous. And it works better than almost anything else.
Push your forehead slightly toward the camera while keeping your chin level or tilted very slightly downward. Photographers call this “turtling” because the motion looks like a turtle extending its head from its shell.
Here’s why it works. When your chin sits back in its natural resting position, the skin between your jaw and neck compresses. The camera picks this up as a double chin, even on people who don’t have one in real life.
By pushing your forehead forward, you stretch the skin along your jawline. Your jaw becomes more defined. Your neck looks longer. The area under your chin tightens up.
The key is subtlety. You only need to push forward about an inch. Maybe two. Any more and you’ll look like you’re straining. The adjustment should be invisible to someone standing next to you but dramatically visible in the final photo.
Common mistake: People tilt their chin up to try to stretch their neck. This actually makes things worse because now the camera is shooting up into your nostrils. Keep the chin level or slightly down. Push the forehead forward, not up.
Pose #3: Stand Up Straight (But Not Stiff)
This sounds obvious. It’s not.
Most people, when told to stand up straight, throw their shoulders back so aggressively that they look like they’re about to do a military inspection. That creates tension in the neck and face, which the camera reads as stiffness.
The better cue is this: imagine there’s a string attached to the top of your head, gently pulling you toward the ceiling. Your spine lengthens. Your shoulders naturally drop and settle back. Your chest opens slightly.
Good posture does two things for slimming. First, it elongates your torso so you appear taller and leaner. Second, it pulls your shoulders back just enough to create a natural tapering line from your shoulders down to your waist.
Slouching does the opposite. It compresses your midsection, pushes your belly forward, and rounds your shoulders inward, all of which make you look heavier and less confident.
The irony? Standing with good posture actually requires less effort than slouching. It just feels unfamiliar because most of us hunch over desks all day.
Pose #4: Create Space Between Your Arms and Body
When your arms press flat against your sides, they merge with your torso in the photo. The camera can’t distinguish where your arm ends and your body begins. The result? You look wider than you are.
The fix is simple. Create a small gap between your upper arms and your body.
There are a few natural ways to do this. You can place one hand on your hip (this creates a triangle of space between your arm, torso, and hand). You can hold something, like a folder or a coffee cup. You can rest one hand lightly in a pocket with your elbow slightly bent outward. Or you can simply let your arms hang naturally but with a slight bend at the elbow, keeping them from pressing against your sides.
Headshot photographer Peter Hurley popularized a technique he calls “Hold Your Sub.” Imagine you’re holding a giant submarine sandwich under each arm. This tucks your elbows in while pulling your shoulder blades back, creating a narrower shoulder profile without the arm-spreading effect of hands on hips.
The difference in photos is striking. Same person, same outfit, same lighting. Arms pressed in versus arms slightly away from the body can easily look like a five to ten pound difference.
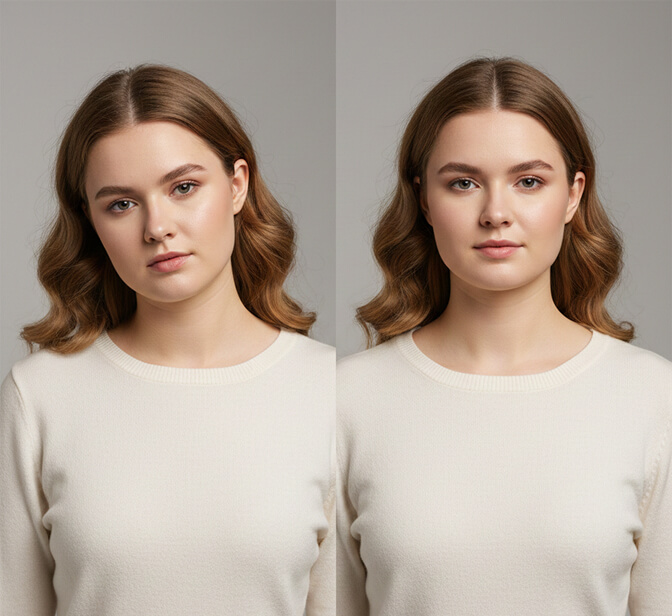
Pose #5: Shoot From Slightly Above Eye Level
Camera angle matters enormously for how flattering your headshot poses look.
When the camera is below your eye level, it shoots upward into your face. This emphasizes the underside of your chin, makes your nostrils more visible, and can make your face look rounder and heavier.
When the camera is at or slightly above your eye level, the opposite happens. The downward angle slims the face, defines the jawline, and makes your eyes appear larger and more engaging.
You don’t need much elevation. Having the photographer stand on a small step, or simply raising the camera a few inches above your natural eye line, is plenty. Going too high creates that unflattering “selfie from above” look where your forehead dominates the frame.
If you’re doing a DIY headshot at home: Set your phone or camera on a tripod at forehead height rather than chin height. This single adjustment can transform the shot.
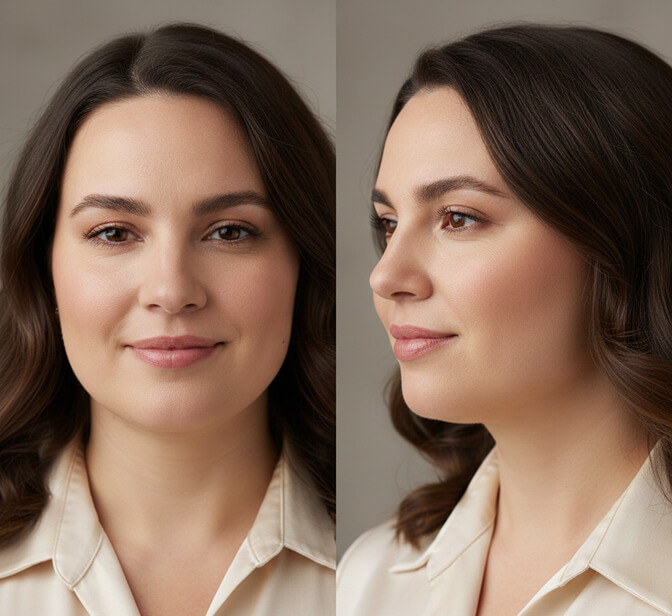
Pose #6: Find Your Good Side (Yes, You Have One)
Almost nobody has a perfectly symmetrical face. One eye is usually slightly larger than the other. One cheekbone sits a bit higher. One side of your jaw is more defined.
This means one side of your face photographs better than the other. Figuring out which side that is, and presenting it to the camera, can make a meaningful difference in how slim and defined your face looks in the final image.
Here’s a simple way to figure it out. Take two selfies. One from the left, one from the right. Same lighting, same distance. Compare them side by side. Most people have an immediate gut reaction about which one they prefer.
A general guideline: the side where you part your hair is usually the side you subconsciously prefer to show. But experiment. What looks good in the mirror doesn’t always translate identically to camera.
For female headshot poses, presenting your preferred side while incorporating the 45-degree angle from Pose #1 creates a particularly flattering combination. The angled body slims the silhouette while the best side of your face stays prominent.
Pose #7: What You Wear Matters More Than You Think
Posing doesn’t exist in a vacuum. Your clothing works with or against your poses. Here’s what works for looking slimmer in headshots.
V-necks and open collars elongate the neck and draw the eye downward in a slimming line. Round necklines, turtlenecks, and crew necks do the opposite, they cut a horizontal line across your upper body that can make you look wider.
Dark, solid colors remain the most reliably slimming option. Black, navy, charcoal, and deep jewel tones all create a streamlined silhouette. This isn’t a secret, it’s basic physics. Dark colors absorb light while bright colors reflect it, making the area appear smaller.
Fitted clothing (not tight, not baggy) follows the natural line of your body without adding extra bulk. Baggy clothing hides your actual shape and replaces it with a bigger, shapeless one. Overly tight clothing creates pulls and wrinkles that the camera picks up and exaggerates.
Avoid horizontal stripes and large patterns. These draw the eye sideways across your body, widening whatever they cover. Vertical lines and subtle textures are your friends.
For more detailed guidance on what to wear for headshots, we’ve got a full breakdown covering everything from fabric choice to color psychology.

The Technique Nobody Talks About: Combine Posing With Lighting
Most advice articles give you posing tips or lighting tips. Rarely both together. But the real magic happens when you combine them.
Soft, frontal light minimizes shadows on your face, which is why it’s the gold standard for flattering headshot lighting. But that same soft frontal light also reduces the visual weight of your face by eliminating the dark pockets that make features look heavier.
Side lighting, on the other hand, can be used to create a dramatic slimming effect. When light hits one side of your face and the other side falls into gentle shadow, the shadow side visually recedes. Your face appears narrower. The combination of a 45-degree body angle, a chin push, good posture, and strategically placed light is what separates a truly flattering headshot from a merely “okay” one. Any one of these techniques helps. All of them together can be transformative.
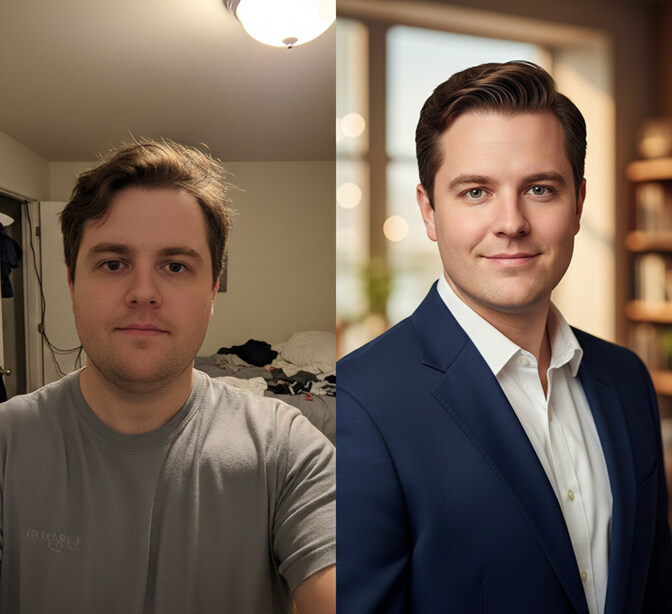
Why AI Headshots Skip the Posing Problem Entirely
Here’s the thing nobody in the traditional photography world wants to admit.
Most of the posing anxiety people feel about headshots comes from the live, in-person nature of the experience. You’re standing in front of a stranger with a camera. You feel self-conscious. Your body tenses. You forget every tip you’ve read. The photographer takes 200 shots and maybe five of them catch you at a decent angle.
This is exactly why AI headshot generators have changed the game for professionals who dread the traditional headshot process.
When you use an AI headshot generator like HeadshotPhoto, you upload a handful of casual selfies. The AI, trained on millions of professionally shot portraits, already understands optimal posing angles, jawline definition, shoulder positioning, and body proportions. It applies all of these principles automatically.
No awkward posing session. No self-conscious moments in front of a photographer. No wondering if you angled your chin correctly.
The AI essentially gives you the result of perfect posing without requiring you to actually hold the pose. It knows what flattering looks like because it’s learned from the best professional portraits ever taken.
And here’s what matters most: AI headshots don’t distort your body. They present your real features with optimal angles and proportions. The difference between a bad pose and a good one isn’t about changing how you look. It’s about removing the distortions that cameras introduce. AI handles that automatically.
Quick Checklist: Slimming Poses for Any Headshot Situation
If you’re getting photographed by a professional:
- Ask them to shoot from slightly above your eye level
- Turn your body 45 degrees and rotate your head back to camera
- Push your chin forward slightly (the turtle)
- Keep arms slightly away from your body
- Roll your shoulders back and down, then relax
If you’re taking a DIY headshot at home:
- Set the camera at forehead height, not chin height
- Face a large window for soft, frontal light
- Stand at an angle to the camera
- Use a timer so you’re not holding the phone (arm extension adds width)
- Take 20+ shots and pick the best angle
If you’re using an AI headshot generator:
- Upload clear, well-lit photos where your face is visible
- Include a few different angles in your uploads
- Choose professional studio styles, the AI optimizes the pose automatically
- Headshot Photo handles lighting, angle, and composition for you, no posing required
One Last Thing
If there’s one takeaway from this entire article, it’s this. The best slimming pose for your headshot is the one you practice before the shoot. Stand in front of a mirror tonight. Turn 45 degrees. Push your chin forward slightly. Roll your shoulders back. Notice how different you look from the person who was standing square and flat just ten seconds ago. That person in the mirror, the one with the angled shoulders and defined jawline, is the same person. Same body. Same face. Same everything. The only difference is awareness of how cameras work and two seconds of intentional positioning. David, my financial advisor colleague, eventually got his headshots redone. This time he knew the tricks. He turned his body, pushed his chin forward, and stood tall. Same photographer. Same studio. Completely different results.
“My clients actually recognize me now,” he told me, laughing.
If you’re not ready to book another photographer, or if the whole in-person headshot experience gives you anxiety, there’s always the AI route. Upload a few selfies to HeadshotPhoto and let the technology handle the posing, the lighting, and the angles. You’ll get studio-quality results in about ten minutes, for a fraction of what a traditional session costs.
Either way, stop blaming your body for bad headshots. It was never the problem.
The pose was.
Frequently Asked Questions
What is the most flattering pose for a headshot?
The most flattering pose for a headshot is the 45-degree body angle combined with the chin push technique. Turn your body about 45 degrees away from the camera, rotate your head back to face the lens, and push your forehead slightly forward while keeping your chin level. This combination slims the body, defines the jawline, and creates a professional, dynamic look that works for virtually every face shape and body type.
How do you pose to look 10 pounds thinner in photos?
To look thinner in photos, combine several techniques. Angle your body 45 degrees instead of facing the camera head-on, push your chin slightly forward to define your jawline, stand with good posture to elongate your torso, keep your arms slightly away from your body, and ask for the camera to be positioned at or slightly above eye level. Wearing dark, solid-colored, well-fitted clothing with a V-neckline adds to the slimming effect.
Does camera angle really make a difference in headshots?
Absolutely. A camera positioned below eye level shoots upward, emphasizing the underside of your chin and making your face look rounder. A camera at or slightly above eye level creates a downward angle that defines the jawline, slims the face, and makes eyes appear more open and engaging. Even a difference of two to three inches in camera height can noticeably change how slim your face appears.
Can AI headshots make you look slimmer without editing?
Yes. AI headshot generators like HeadshotPhoto are trained on millions of professionally photographed portraits where optimal posing and lighting were already applied. The AI automatically presents your features with the most flattering angles, light placement, and proportions, without manually altering your body. The result looks like you on your best day with perfect posing, not a digitally altered version of yourself.
What should I wear to look slimmer in a headshot?
Wear dark, solid-colored clothing in shades like black, navy, charcoal, or deep jewel tones. Choose V-neck or open collar styles that elongate the neck. Make sure clothing fits well without being too tight or too loose. Avoid horizontal stripes, large patterns, and bright colors that reflect light and make areas appear larger. Structured fabrics like blazers create clean lines that photograph well.
